Monday, August 5, 2013

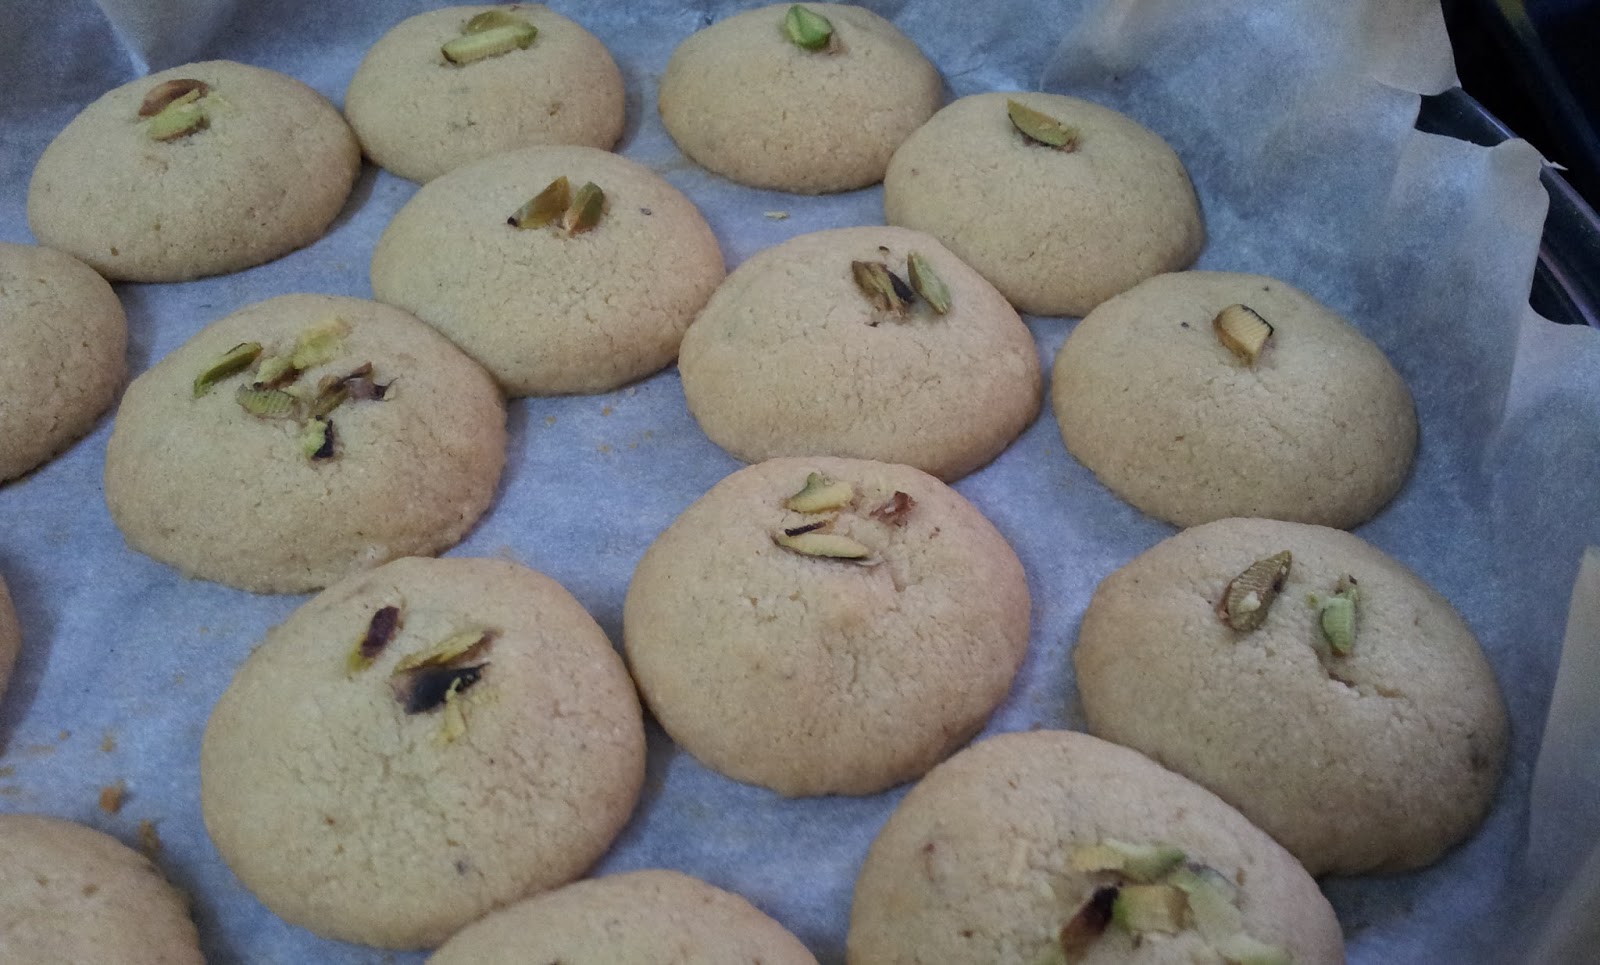
Nan Khatai (Indian Eggless Short Bread Cookies) - Perfect for tea time!

Baking cookies at home was a distant fantasy when I started implementing my culinary skills about 5-6 years back. It was all about cooking and not baking at that time, mostly various curries like Chicken, Mutton, Fish or Eggs (Yes, I swear by Meat, I apologize if it offends anyone). Vegetarian food slowly made its way to my Kitchen since the nuptials about 2.5 years back as we wanted something simpler for Dinner to be eaten with Chapati’s (Indian Roasted Flat Breads).


I could dish out full course meals but the Oven was still new to me. It has been my companion for the last 2 years I should think. However, it took me a while to differentiate between the Convection, Grill and the other functions of my Microwave Oven (You are right, I do not own a conventional Oven or an OTG for that matter, all I have is a Microwave Oven with the Convection function and I bake all my goodies there .. to be honest I do not have much space left in my Kitchen to accommodate another Oven)


Our Parents visit us once a year as we stay away from home and this is a time of the year we look forward to. My Parents are here with me now and the other day when I baked some Tutti Frutti Biscotti’s and the dough went a little out of control, Maa (My Mum) had to intervene to get it back in control and that’s when she realized that there were Eggs in the dough & did not like the idea at all; though she enjoyed the Biscotti’s, she was not thoroughly satisfied.  She dedicated the entire afternoon thinking about a replacement of Eggs in that batter and by evening she started giving me ideas of unsalted Butter, Clarified Butter (Ghee), Whole Milk & Curd to be used in the batter.


My Tutti Frutti Biscotti

Once Weekend arrived, I wanted to give a shot at the Eggless Cookies and decided to bake the best Indian Eggless Tea Time Cookies - ‘Nan Khatai’ - My entire family loved them and I shamelessly admit I liked these better than cookies with Eggs in them. Some study about these told me they were handed down by Dutch Colonizers as early as the 16th Century to Parsi entrepreneurs who owned Bakeries in Surat, the Capital City of Gujarat India. Hence we can summarize that’s where they belong, the State of Gujarat.  These short bread Cookies are generally smeared with Desi Ghee, however, you can replace the same with Unsalted Butter and use only a little bit of Clarified Butter (Ghee) for the whiff like I did.


My friend from work, ‘P’ helped me with the recipe who had shared her secret Punjabi Chhole Masala recipe earlier which can be found here. I did make my own changes and adjustments to her Nan Khatai recipe and here is what I did:


Here is what you will need to make about 32-34 Nan Khatai’s:


All Purpose Flour (Maida): 1 Cup
Semolina (Suji): ½ Cup
Gram Flour (Besan): ½ Cup
Granulated Sugar: 1 Cup
Unsalted Butter: 3/4th Cup
Clarified Butter / Ghee: 1/4th Cup (If you want to skip unsalted Butter, use 1 cup of Ghee)
Ground Green Cardamom – ½ tsp
Pistachios: flaked 1 tbsp


How to make Nan Khatai’s:

Cream the Butter and Granulated Sugar in a large bowl with a wire whisk till fluffy

Add the dry ingredients, All Purpose Flour, Semolina, Gram Flour and Ground Green Cardamom and knead this mixture into medium soft dough. (A tsp or two of whole Milk can be added to the dough in case it does not come together; mine did come together nicely, however, you can keep a little Milk handy)

Cover the dough and let it rest for 15 minutes

Pre-heat the Oven to 200C / 392F** in the meanwhile

Line the Baking tray with a parchment paper

Make small roundels from the dough and place them on the parchment paper an inch apart

Add a few strands of the Pistachio flakes on top for garnish


Change the Microwave Oven to the Convection mode once preheating has completed. Put it to 180C / 356F in the Convection mode and bake the cookies for 30 minutes or till golden and crisp**

**(Exactly what I did in my Microwave Oven, all Ovens are different so adjust as per your Oven)


P.S: I have not posted here in a few months; hence lost the habit of watermarking. I am posting this with the hope that the pictures will not be stolen, thanks in advance!


Tuesday, April 2, 2013

Chicken Vindaloo - Goan Chicken Curry


During the weekend, I went to shop for Meat and Fish and got a Rohu which weighed about 1.25 Kilos, half of which went in making Methi Fish which tasted out of this World, half is still in the Freezer and I am still contemplating something nice with it; I also got 1.25 Kilos of Chicken (I know the similar weight sounds weird but it was not intentional :P 1.25 Kg of Chicken normally gives you 1 Kg once you skin it and get rid of the livers (no one eats Chicken livers at my house), with half of this Chicken I made Chicken Vindaloo – the Goan classic yesterday! Here, take a look:


We ate this for Lunch today and will eat it for Dinner too, I think that means it definitely scored well in our Kitchen :P So here is the recipe for you


Here is what you will need to make Goan Chicken Vindaloo:

Chicken – 500 gms, cut into medium pieces, cleaned
Kashmiri Red Chili Whole – 5 / to taste
Cumin Seeds – ½ tsp
Whole Black Peppercorns – ½ tsp
Cinnamon – ½ “ stick
Cloves – 3
Onion – 1 medium – sliced
Ginger – 1” stick – roughly chopped
Garlic – 6 cloves – roughly chopped
Tomato – 1 medium – roughly chopped
Cooking Oil
Turmeric Powder – 1 tsp
Salt to taste
Vinegar – 2 tsp


How to make Goan Chicken Vindaloo:

Clean the Chicken, pat them dry, marinate with some Salt and keep

Soak all Kashmiri whole Red Chilies, Whole Black Peppercorns, Cinnamon and Cloves in a little luke warm water and keep

Heat Oil in a Pan; add the sliced Onions, roughly chopped Onion, Garlic and Ginger and sauté for about 3-4 minutes

Add the roughly chopped Tomatoes in a sauté for another 2-3 minutes
Switch off the Stove and give it 5 minutes to cool down

In a Blender, put everything from the Pan, the spices that we had soaked in luke warm water earlier, the vinegar and the Turmeric Powder & grind into a smooth paste

Pour this paste back into the pan, add about a cup of luke warm water and bring it to boil

Pour the marinated Chicken pieces in, slow cook ‘covered’ on medium flame till the Chicken pieces become tender

Uncover when the Chicken is done and cook till you have the gravy as per desired consistency

Garnish with Whole Dry Red Chiles and Whole Black Peppercorns


Serve with steamed White Rice

If You Like My Page Please Join Me On My Facebook Page


Monday, April 1, 2013

Methi Rui - Fish (Rohu) in Fenugreek Sauce


My dear friend ‘S’, sitting in the US of A sends me this super awesome recipe.  Sometime last week I got her email with a picture of Methi Rui & liked it instantaneously, I asked her for the recipe and my email was returned in no time. She mentioned that she made this the same way she makes Methi Chicken & gave me details of the recipe too. Being the foodie that I am, as soon as the weekend knocked, I went and got some Rui (Rohu) from the Market.  I finally made it for Sunday dinner and both ‘A’ & I totally loved it. So all thanks to ‘S’ for this extremely innovative dish, innovative because even I make Methi Chicken all the time but have never thought of changing the main ingredient to Fish and yielding such brilliant result.


Methi aka Fenugreek is used variedly in Indian cuisine. Be it the herb form (dried, Kasuri Methi or fresh leaves), be it as spice seeds or even as a vegetable (like in Methi Parantha’s). I used both the herb and the seed form in this dish. Fenugreek leaves are enriched with minerals like Potassium, Calcium and Iron.  The leaves are rich in Vitamin C and K as well, hence of great medicinal value

Here is what you will need to make Methi Rui / Fish (Rohu) in Fenugreek Sauce :


Rohu or any other Fresh water Fish – 500 gms (I had 7 small pieces)
Methi/Fenugreek Seeds – 1 tsp
Onion – 1 – medium – made into paste
Ginger – 1” – made into paste (not a part of the original recipe)
Garlic – 5 medium cloves – made into paste
Green Chili – 3/ to taste – made into paste
Curd – 2 tbsp (‘S’ advised to use Hung curd, I did not have any hence used regular store bought Curd)
Turmeric Powder - 1+1 tsp
Red Chili Powder – 1 tsp (not a part of the original recipe)
Kasuri Methi (dried Fenugreek leaves) – 2 tsp
Salt – to taste
Mustard Oil / Cooking Oil – 2.5 tbsp
Ghee / Clarified Butter – 1 tsp


Here is how you make Methi Rui / Fish (Rohu) in Fenugreek Sauce:

I made a paste of Onion, Ginger, Garlic and Green Chili together and kept it aside to use once I am done with frying the Fish.

Clean the Fish pieces, smear with Salt and Turmeric; heat Mustard / Cooking Oil in a Pan till smoking, throw a pinch of Salt in (this will make sure the hot Oil is not all over you when you slide the Fish pieces in), slide the Fish pieces in and fry them till golden on both sides. Once done, drain on Paper Towels if you are finicky like me :P

To the same Oil, add 1 tsp of Methi seeds and let them sizzle, scoop out the seeds and throw; use the Methi scented Oil

To the same Oil, add the Onion-Ginger-Garlic and Green Chili Paste and sauté till the raw smell is gone

In a small bowl, mix 2 tbsp of Curd, 1 tsp Turmeric, 1 tsp Red Chili Powder and Salt to taste and whisk together, add to the sautéed Onion-Ginger-Garlic and Green Chili Paste

Add some Luke Warm water to this and bring it to boil

Once boiling, bring the heat down to simmer and drop the already fried Fish pieces in, cover and cook till you have the right consistency in the gravy

Take 2 tsp of dried Fenugreek leaves (Kasuri Methi), rub between the palms of your hands to get a nice powdery herb and mix to the dish

Drizzle the molten Clarified Butter/Ghee on top, give it a good mix we & are done


P.S : I served this with Plain White Rice hence I had kept some gravy, ‘S’ mentioned she served it with a Veg Pulav; in case you are serving with Pulav then this dish can be as dry as you want

If You Like My Page Please Join Me On My Facebook Page


Tuesday, March 26, 2013

Focaccia - Onion & Oregano flavored


Focaccia (pronounced as Fokashia by some and Fokachia by some others) is a flat Oven baked Italian Bread, which may be topped with herbs or other ingredients (Definition from Wikipedia). I baked this last Saturday when once again, ‘A’ was out playing his Cricket (a tournament which his team won .. YAY!!) & it turned out to be pretty good.  I was really glad after baking this one, it was so flavorful, just like those Breads from the Italian joints, my home smelled heavenly when I baked this.


I did not take pictures at all the stages while baking this. The Yeast proofing is done exactly the same way just like in Challah - Braided Bread; only the quantities differed this time.  

Here is what you will need to make my Onion and Oregano flavored Focaccia:

This recipe is adapted from www.showmethecurry.com recipe of Focaccia – Easy Bread Recipe

My Recipe is here:

Active Dry Yeast – 2 tsp
Warm Water - 1 2/3 Cups  (I Microwave the water for Yeast Proofing at high for 30 seconds, it definitely feels higher than 60c/140F but it gives fantastic results, DO NOT use boiling Water, that would kill the Yeast)
Sugar – 1 tsp
All Purpose Flour – 5 cups
Salt – 2 tsp
EVOO (Extra Virgin Olive Oil) – ¼ th Cup + 5 tbsps
Onion – ½ of a large – thinly sliced
Oregano – 2 tsp
Italian Seasoning – 1 tbsp
Salt to taste


How to make Onion & Oregano flavored Focaccia:

Yeast Proofing: In a large bowl, add 2 tsps of Active Dry Yeast in 1 2/3 Cups of Luke Warm water & 1 tsp of Sugar, mix and let it rest for 10 minutes. After 10 minutes, a foamy mix will form of the Yeast, Water & Sugar indicating that Yeast has been proofed

Add Salt, ¼ th Cup of EVOO, 1 tbsp Italian Seasoning & 5 Cups of All-purpose Flour, add the Flour 1 cup at a time and keep mixing with a Spatula till a gooey dough is formed, adding more and more flour will result in the dough becoming stable in consistency; once it becomes manageable, put it on a working surface dusted with dry flour and start kneading it, knead it will for about 5-7 minutes, add extra flour when needed till it forms a smooth dough

In the same large bowl, grease the surface with a little bit of EVOO, tuck in the sides of the dough into a tight round, oil the upper surface of the dough, cover with a Kitchen towel and let it rest for 2 hours, neat

After 2 hours, the dough would have doubled in size, punch down the dough, grease the baking tray with 1 tbsp of EVOO and put the dough in, stretch the dough on all the sides so that it fits well into the baking tray, cover with a Kitchen towel and let it rise a second time for another hour

While it rises for the second time, thinly slice the Onion and dip into 3 tbsp of EVOO, add the Oregano and mix. Pre heat your Oven to 250C


Once the dough has risen the second time, dip the index finger of your working hand into a tbsp of EVOO and make small indentions about an inch apart on the risen dough, you have to dip your finger a few times before achieving all the indention's

Once done, with a brush spread the EVOO-Onion-Oregano mix onto the dough, make sure you cover all the edges so that they do not dry out while baking. The Onion slices will not stay at the bottom of the bowl you mixed it in and not come out with a brush, use a spoon to layer the Onions & whatever little liquid is left in the bowl onto the dough

I changed the Microwave mode to Convection and baked the Bread for 25 minutes at 220C (All Ovens are different so keep an eye on it after it crosses the 18-20 minute mark, we do not want a dark brown color on the surface, we want a soft brown crust on our Focaccia


Once done, please it on a cooling Rack and give it 30 minutes to cool down
Even after 30 minutes it will be nice and warm inside, eat by dipping the bread into EVOO or some Hummus

If You Like My Page Please Join Me On My Facebook Page

Monday, March 25, 2013

Kashundi Chicken


Chicken has been my stable diet since I was a kid. If you include just 1 tiny piece of Chicken in my meal, I will eat anything that you serve to me with it without any complaints; I know that quite sounds like our four legged companions, but I am totally lame when it comes to eating vegetables, so even 1 teeny-weeny bit of Chicken makes me smile.


A couple of days back my Sis In Law back in the City of Joy made this scrumptious Kashundi Chicken and shared the photo. Kashundi means a  very Bengali Mustard Dip / Sauce made with Black Mustard Seeds, Green Chilies, Ginger & Garlic which tastes out of this World – mostly to be eaten with Chops & Cutlets.  When you add Raw Mango to it, it is called ‘Aam Kashundi’ (Aam meaning Mangoes in Bengali) which tastes even better in my view; & I am again going weak on my knees thinking about the Aam Kashundi Chingri I once had at Oh! Calcutta – it was indescribable. I sure will post a photo of that dish in my blog if I can find one.


& I found it, that's Aam Kashundi Chingri from Oh! Calcutta, highly recommended!

Coming back to the recipe, my Sis In Law made this following BongMom’s recipe. She added her special touch to it by adding a bit of Curd to this dish – it tasted wonderful. I made it her way and made minor changes to the original recipe.


Here is the recipe for Kashundi Chicken with the minor changes

Chicken – 750 gms, cleaned and skinned it comes to about 500-550 gms
Grated Ginger – 1tsp
Grated Garlic – 1 tsp
Lemon Juice – 1.5 tsp
Salt to taste
Mustard Oil – 1 tbsp – use any other cooking Oil if you do not have Mustard

Put all this together and marinate the Chicken for an hour, covered

Kalonji  / Onion Seeds – ½ tsp
Green Chilies – broken from middle – 10
Turmeric Powder  –  1 tsp
Red Chili Powder – 1 tsp
Kashundi - 3 tbsp
Coconut Milk – 1 Cup (I used Maggi Coconut Milk Powder and mixed the same into 1 Cup of Luke warm water)
Curd – 2 tbsp – beaten with a pinch of Salt (I used homemade Curd)
Mustard Oil – 2 tbsp

Method:

Heat 2 tbsp of Mustard Oil in a Pan

Add the Onion Seeds / Kalonji  and let it splutter

Add  5 broken Green Chilies and let them sizzle

Add the Chicken pieces and not the marinade, in case there is anything watery left in there

Cook the Chicken pieces till they change color

Add Turmeric Powder & Red Chili Powder and stir them in – cook for 2-3 mins

Add 3 tbsps of Kashundi and mix well, give it about 2 minutes to settle in

Add the Coconut Milk and Curd and any marinade that was left

Cover and let the Chicken Cook thoroughly, keep the Gas Stove on Simmer

Once the dish is done, garnish with the other 5 broken Green chilies, the gravy will be thick in consistency and not runny


Eat with steaming White Rice


Friday, March 22, 2013

Maach-er Matha diye Moog-er Dal / Yellow Lentil Soup with Fish Head


A Heady Lentil Soup is what this dish is. It is so heavy and yummy at the same time, I can eat steamed Rice only with this Lentil Soup without any sides. Yes, we Bengalis, do not throw away any part of our Sacred Fish, especially when it comes to a Fish as tasty as the Katla; the preparation can be made with Rohu Fish Head too, but nothing beats the juicy head of a Katla. This is mostly prepared during Aiburo-Bhaat (last Bachelor Meal before the Wedding), Poite (Sacred Thread Ceremonies), Griho-Probesh (House Warming) & various other functions, mad Bongs like ‘A’ & Me even make this for dinner for their Anniversary Celebration and serve to their non Bong guests and surprise them :D


Here is what you will need to make Maach-er Matha diye Moog-er Dal / Yellow Lentil Soup with Fish Head:

A fairly large Fish Head – 1, cleaned and sliced into two halves – My Katla weighed 1.7 KG, hence the head was the size I was looking for
Moog-er Dal / Yellow Lentil – 1 Cup
Mustard Oil (Use any other cooking Oil if you do not have Mustard, but tradition says, it tastes best with Mustard) - 2 tbsp + 1 tsp
Ghee/ Clarified Butter – 1 tsp
Bay Leaf – 2
Whole Cumin Seeds – 1tsp
Whole Dry Red Chilies - 2
Cinnamon – 1“long stick
Green Cardamoms - 3
Cloves – 3
Turmeric Powder – 1tsp + ½ tsp + 1 tsp
Cumin Powder - 1 tsp
Coriander Powder – 1 tsp
Red Chili Powder – 1 tsp
Garam Masala Powder – 1 tsp
Ginger – grated – 1 tsp
Green Chili - 2 - broken from between
Salt to taste
Sugar to balance

How to make Maach-er Matha diye Moog-er Dal / Yellow Lentil Soup with Fish Head:

In a Pan, dry roast the Yellow Lentil till you get the lovely aroma of roasted Moog, be careful not to burn them, once the color changes to light golden, turn off the stove, wash the Lentil under running water, Pressure Cook the Lentil in 1 Cup of Water ½ tsp of Turmeric, let the pressure go down on it own an set aside


Smear  Salt and 1 tsp of Turmeric on the Fish Head pieces, heat 2 tbsps of Mustard Oil in a Pan till smoking, sprinkle a little salt into the Pan (so that the hot Oil does not splash when you slide the Fish pieces in), slide the Fish heads in, fry well, 3-4 minutes on each side, break them down to smaller pieces with the help of a Spatula if you can, not into very small parts though, say about 5 small chunks from each half of the head, set aside on Paper Towels to get rid of the excess Oil

In the same Pan, add 1 tsp of Oil as most of the Oil must have been absorbed by the Fish Head already, add the Cumin Seeds and let them splutter, add the Whole Dry Red Chilies, Bay Leaves, Cinnamon, Cardamoms and Cloves and sauté for a minute

Add the grated Ginger and cook for another minute

Add the cooked Lentil into this and mix well

Add the Turmeric Powder, Red Chili Powder, Cumin Powder, Coriander Powder, Salt and Sugar to taste and stir around till the dry spices are cooked

Add the chunks of Fish head into this and mix well

Add desired quantity of luke warm water and bring it to boil, keep in mind both the Lentil and the Fish head are cooked already, we are just trying to bring the dish together and let the flavors intermingle into each other, hence do not add too much water, also this lentil soup will be thick unlike Bengali Red Lentil Soup, so add just as much water as you would like in your dish

Once done, add 1 tsp f clarified Butter to this and give it one final mix, sprinkle the 1 tsp of Garam Masala Powder & broken Green Chilies as well


Serve with steamed Rice

If You Like My Page Please Join Me On My Facebook Page